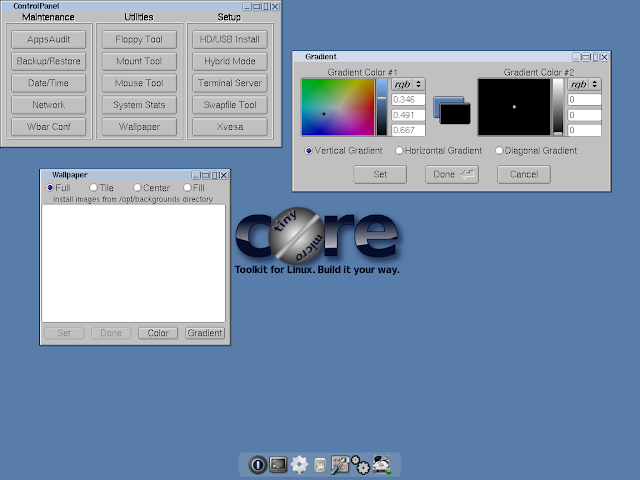
 Tiny Core Linux is a very small (10 MB) minimal Linux desktop. It is based on Linux 2.6 kernel, BusyBox, Tiny X, FLTK graphical user interface and JWM window manager, running entirely in memory.
 It is not a complete desktop, nor is all hardware completely supported; it represents only the core needed to boot into a very minimal X Window desktop, typically with wired Internet access.
This minimal desktop can be extended by installing additional applications from online repositories.
The rapid development of Tiny Core Linux, a minimalist desktop distribution in 10 MB, continues with the release of version 2.6 earlier today. What's new? "Updated blkid, libblkid, and libuuid; updated rebuildfstab to drop extra mount points and to reflect removals; new select utility replaces dialog; updated xsetup.sh, mktclocal and tc-terminal-server using select; updated cpanel Apps Audit replaces mktclocal on panel selection; updated missing link libpng.so; dropped cryptohome support; updated tc-config to reflect recent changes; BusyBox mount and losetup replaces GNU variants; updated rc.shutdown for BusyBox syntax; updated tce-load to support BusyBox mount; dropped support for ziofs and cramfs, all extensions are now Squashfs; dropped BusyBox ed, eject, fsck, expand and unexpand applets; BusyBox lsmod, insmod, rmmod, modprobe replace GNU variants...."
Update: (via Distrowatch)
Robert Shingledecker has announced the release of Tiny Core Linux 3.7, a minimalist, but extensible desktop distribution in 10 megabytes: "Team Tiny Core is pleased to announce the release of Tiny Core Linux 3.7. Final change log: new multicore.iso both Tiny Core and Micro Core installation and network tools edition; new added kernel module for NTFS to base, allows read access to NTFS partition; new GUI loadpack to load, when required, Starter Pack after boot; updated rebuildfstab now supports NTFS-3G for NTFS-3G extension, allows read-write access; updated cpanel to reflect changes in the base; updated tc-functions to better handle TCVD virtual disk; updated network GUI to record udhcpc PID for services support when DHCP is requested...."
Here is the release announcement with a changelog.
Download: tinycore_3.7.iso (10.3MB, MD5). The "mulitcore" CD image with a graphical system installer is available from here: multicore_3.7.iso (45.5MB, MD5).
Recent releases:
• 2011-06-16: Distribution Release: Tiny Core Linux 3.7
• 2011-05-01: Distribution Release: Tiny Core Linux 3.6
• 2011-02-14: Distribution Release: Tiny Core Linux 3.5
• 2010-12-19: Distribution Release: Tiny Core Linux 3.4
• 2010-11-23: Distribution Release: Tiny Core Linux 3.3
• 2010-10-15: Distribution Release: Tiny Core Linux 3.2
• 2011-05-01: Distribution Release: Tiny Core Linux 3.6
• 2011-02-14: Distribution Release: Tiny Core Linux 3.5
• 2010-12-19: Distribution Release: Tiny Core Linux 3.4
• 2010-11-23: Distribution Release: Tiny Core Linux 3.3
• 2010-10-15: Distribution Release: Tiny Core Linux 3.2
Install Tiny Core Linux.
Introduction
This guide shows step by step information on how to partition a blank IDE hard drive using cfdisk, copy over the TC operating system files, and install the GRUB bootloader on that drive.
It assumes that TC was booted from a liveCD and is already running on the target system with Internet access.
Keep in mind that this guide is basic and that the user may choose to adapt, remove and/or add parts as desired.
The result: a standard TC PPR installation.
Note: If you already have a Linux System booting via Grub, then you do not need to make a partition for Tiny Core! Tiny Core can run in a couple of directories in your existing Linux Grub installation. Skip to Step 5. You will only need to do Step 5 and add a Grub menu item (title, kernel, and initrd lines) as shown in Step 6.
1. Obtaining cfdisk and GRUB via Appbrowser
Click on the wbar icon Apps (or access the right-click menu on the desktop and selecting Appbrowser)
Click on File > Connect
The list on the left side should now be populated. Select cfdisk.tcz from the list.
Then click Install Selected button located in the bottom left corner. It should report that it was installed successfully.
Now repeat this process, by selecting and installing grub-0.97-splash.tcz.
2. Open a root shell
In JWM, you can right-click the desktop to access the menu, and then navigate to XShells > Root Access > Dark. (Choose one)
3. Partitioning
Find a disk you want to install on. The following command will list your disks and their current partitions.
fdisk -l
Remember which disk will be used for installation. For the purposes of this guide, /dev/hda will be used.
The cfdisk command will be used to partition the hard drives.
cfdisk /dev/hda
Use the left and right arrow keys to navigate the bottom menu, and press Enter to select an option.
Navigate and select [ New ]
Select [ Primary ]
Input the size by entering the numbers you want, or accept the default. Press enter to accept. This demonstration will use 100 MB.
If prompted, choose where to put the new partition.
Set the boot flag on the new partition by selecting [ Bootable ]. Remember this partition as it will be used for installation. This guide will use hda1.
Setup the rest of the disk if preferred, when completed.
Select [ Write ]
Confirm the write by entering "yes":
Select [ Quit ]
4. Formatting
Format the new partition. This demonstration will use ext3. You may format other partitions here as preferred.
mkfs.ext3 /dev/hda1
5. Copy over TC system files and prepare for PPR mode.
Mount the new install partition:
mount /mnt/hda1
Create directories for TC files and GRUB:
mkdir -p /mnt/hda1/boot/grub
Mount the original boot media. For this guide, TC was booted from an IDE cd-rom drive on the second channel:
mount /mnt/hdc
Copy over the file:
cp -p /mnt/hdc/boot/* /mnt/hda1/boot/
This will copy over bzImage and tinycore.gz. Ignore any "omitting directory" warnings.
Next setup the tce directory to store application extensions:
mkdir -p /mnt/hda1/tce
Prepare file for backup & restore
touch /mnt/hda1/tce/mydata.tgz
6. Installing GRUB
Copy over GRUB files:
cp -p /usr/lib/grub/i386-pc/* /mnt/hda1/boot/grub/
Create menu.lst: (note that "lst" contains a lower case 'L')
vi /mnt/hda1/boot/grub/menu.lst
Presss i (enters insert mode)
Enter the following:
default 0
timeout 10
title tinycore
kernel /boot/bzImage quiet
initrd /boot/tinycore.gz
Optionally, add other bootcodes now on the kernel line separated by spaces. Note: If you are using a pendrive or other Flash device, be sure to add the boot code of waitusb=5
Press <esc> when done. Enter :x (saves and quits)
Run GRUB:
grub
Note that grub uses hd numbers in the form of (hdM,n) and (hdM), instead of hdXy and hdX.
M corresponds to a number from '0', which represents 'a' for X.
For every letter after that, add one.
'b' is '1', 'c' is '2', 'd' is '3', etc.
n corresponds to a number from '0', which represents '1' for y.
Subtract 1 from y to get n.
'1' becomes '0', '2' becomes '1', '3' becomes '2', etc.
Subtract 1 from y to get n.
'1' becomes '0', '2' becomes '1', '3' becomes '2', etc.
Since this guide is using hda1 for hdXy, this means that (hdM,n) is (hd0,0)
and that the use of hda for hdX means (hdM) is (hd0)
and that the use of hda for hdX means (hdM) is (hd0)
In the grub prompt,
root (hd0,0)
setup (hd0)
quit
root (hd0,0)
setup (hd0)
quit
Note: you can use tab for auto-complete.
7. Testing
TC and GRUB are now installed!
Remove the original CD boot media:
umount /mnt/hdc
eject /dev/hdc
eject /dev/hdc
To test, reboot the system.
reboot

Custom Search
If you liked this article, subscribe to the feed by clicking the image below to keep informed about new contents of the blog:


0 commenti:
Post a Comment